This tutorial is intended to show you how to use TeleAuto to measure the
magnitude of a specific object like a star or asteroid. The photometric
measurement of extended objects will be the subject of another function.
The images and screen shots of the TeleAuto interface are from
version 2.66. These may look different in later versions of the program.
How does TeleAuto measure flux of specific objects ?
To measure the flux of a specific object, TeleAuto uses the mathematical
model which represents it as accurately as possible, i.e. the mathematical
function which gives the best fit to the shape of the object.
The models available in TeleAuto are
- the Gaussian model adapted to the modeling of quite round stars.
Its one-dimensional function is:
where C is the level of the sky background, H is the maximum intensity, Xc
is the co-ordinate of the centre and sigma is the width of the Gaussian.
- The Gaussian ellipsoid model which is an adaptation to allow the
modeling of slightly elongated stars.
- The Moffat model which was added with the aim of testing it. It should
be more effective than the Gaussian model because it approximates better to
the theoretical shape of stars.
The sky background is modeled at the same time as the object by a polynomial
of degree 0 (constant), 1 (plane) or 2 (parabola).
Modeling is done in a small square surrounding the star.
The method of calculation of the model is that of Levenberg Marquadt which
makes it possible to minimize modeling errors. Moreover the calculation is
iterative so as to produce the best possible modeling.
La méthode de calcul du modèle est celle de Levenberg
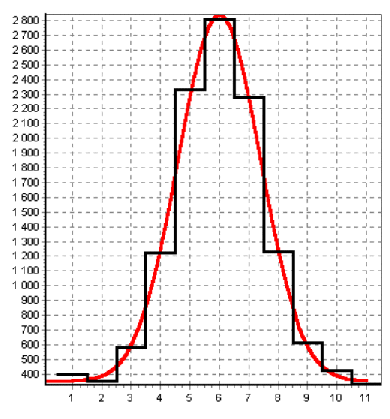
Here for example is a comparison of the modeling in red, compared to the
pixelized real shape of the star in black :
How to configure photometry ?
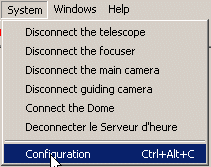
To configure the of manual photometry function in TeleAuto, click System/Configuration
to reveal the configuration window:
The configuration window appears :
Then click on the line System then Photometry :
You can then configure the manual photometry function of TeleAuto:
Click on the form of the photometry which you wish to use in the Type zone.
The main choice is betwen the Aperture photometry and the modelisation photometry.
The preferred choice for modelisation is the Ellipsoidal Gaussian which
minimizes the modeling errors when the stars are slightly elongated. You can use
the Gaussian method if your stars are perfectly round. The Moffat function
can be used to test it. Do not hesitate to bring back your results to us.
Click on measurement method you wish to use in the zone Multi-standards measure.
Calculation with super stars is described in
an article in CCD and Télescope.
This method gives excellent results and should be used in preference.
You should also select this method if you only have one standard star.
The choice by with reference calculation makes it possible to calculate the
reference magnitude corresponding to a star of flow 1 ADU (Analog to DIGITAL
Unit = a digitization step). It is the Reference in the following Pogson formula:
Magnitude = Reference - 2.5 x Log (
FluxObjet)
This reference is calculated by the method of least squares which in this case
is equivalent to a simple average. The quality of the results by this method is the
same as with the super star method. Calculation with linear regression is a linear least
squares method which makes it possible to calculate the reference and the slope of the
right-hand side magnitudes at the same time. It is assumed here that a bias in the
flux measurement introduces an error in the slope on the right-hand side of the
equation which is normally 2.5. One thus calculates the Reference and the Slope
in the following Pogson formula:
Magnitude = Reference - Slope
x Log ( FluxObjet)
This method was added to test it. It has been noticed that the measurement uncertainty
is larger with this method. This is due to a larger uncertainty in the Reference.
Work is in hand on this problem. Do not hesitate to bring back your results of test and your views
to us over this subject. I suspect that this function can be more effective than the
preceding ones only when the standards are more numerous. It should thus be very effective
in the future function of automatic calibration where all the stars of the images will
be used as standards.
Varying the Sky modelisation polynom degree makes it possible to model
the sky background. It can take values 0 (constant sky), 1 (In the form of tilted plane),
2 (In the form of parabola). You can use 0 if the image background is quite flat and if
the stars are isolated. You can use value 1 if your image contains signs of a gradient
or a galaxy close to star to be measured. Lastly, value 2 seems to me to be best avoided
because there is a too great a risk of over-estimating the flux of the of the sky
background. Indeed, even if the background had a parabolic form, I do not see how
the algorithm could separate the flux of the sky and the flux of the star.
The Half-width of the modeling window makes it possible to modify the width of the window
inside which the calculation is done. This value is:
Width = 2 x Half-Width + 1
This parameter can vary between 5 and 35 pixels. Starlight, when it passes through
a telescope, is spread out over the entire image. In order to have as great a fraction of the
starlight in the modeling window as possible, ideally one should increase this value to the
maximum, which for 35 pixels is a width of 71. Unfortunately, it is important to avoid the
presence of other stars in the window otherwise they will distort the measurement. The adjustment
of this value thus depends on the distance of stars close to that which one wishes to measure.
Take care not to miss any faint stars ! Generally, this value ends up between 5 and 15. 9 is a
good default value.
In the example which follows, this value was limited to 5 for the supernova to limit the effect
of core of the galaxy on the modeling error.
In the Aperture zone, you can set the radius of the 2 aperture photometry circles.
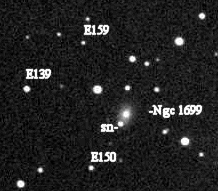
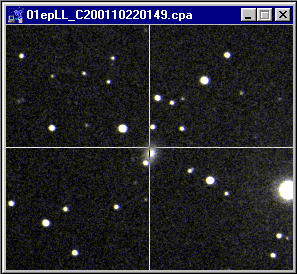
An example measurement of a Supernova
A big thank you to Jean Marie Llapasset who provided us with the following image to allow
us to show you an example of multi-standard photometric measurement using TeleAuto :
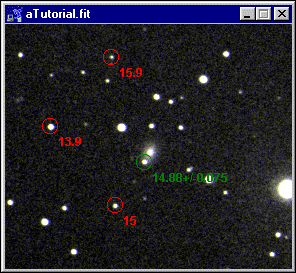
The problem is to measure the magnitude of supernova SN2001ep in galaxy NGC1699 using 3
standard stars. The standards are indicated on the image above by their magnitude found in
catalogues. For example E139 is a standard magnitude 13,9.
Measurement will be done in two stages
1) The calibration
2) The measurement of SN
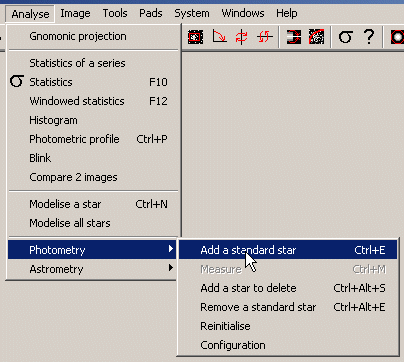
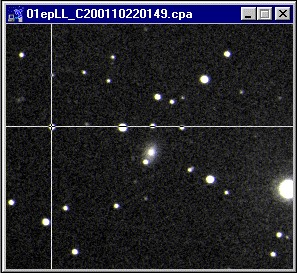
To start, open the image then select Analyse/Photometry/Add a standard star :
Or just type Ctrl+E with the keyboard.
A reticle then appears in the image :
Place it on one of the standards :
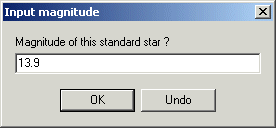
And click to record this star in the list of the standards. Then enter the magnitude
from the catalogue:
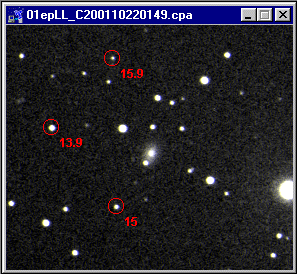
A marker appears then on the standard
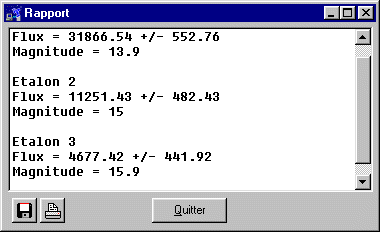
And information on this standard appears in the report window :
Repeat the operation for all the standards :
The report/ratio is supplemented :
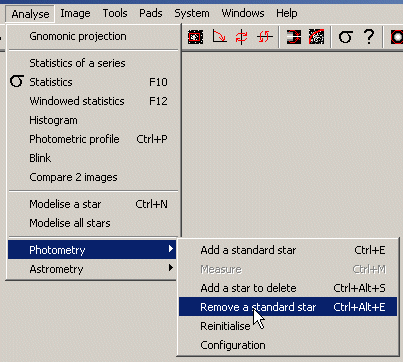
If you enter a standard in error, you can remove it by selecting Analyse/Photometry/Remove a standard star :
Or by typing Ctrl+Alt+E using the keyboard. You can then click on the standard which
you do not wish to use any more.
You can now measure the magnitude of the supernova by selecting Analyse/Photometry/Measure
and then clicking on the supernova. The magnitude of the supernova is displayed directly on the image:
The report/ratio window displays all the requested measurements :
Measure by calculation of reference
Magnitude = 25.12+/-0.034 -2.5*log(flux)
Flow object = 12787.6+/-491.16
Magnitude = 14.85+/-0.076
Measure by linear least squares
Magnitude = 24.717+/-0.084 - 2.401+/-0.021 *log(flow)
Flow object = 12787.6+/-491.16
Magnitude = 14.86+/-0.117
Here there are three paragraphs corresponding to each measurement method requested:
Measure by calculation of reference The first line gives the Pogson formula based on the reference magnitude and its
uncertainty (25.12+/-0.034)
The second line gives the measured flux of the object i.e. SN (12787.6+/-491.16)
The third line gives the result of the measurement thanks to the Pogson formula
from the first line (14.85+/-0.076)
The calculation of uncertainties is done by the propagation of uncertainties.
Measure by linear Least Squares The first line gives the Pogson formula based on the reference magnitude and its
uncertainty (24.717+/-0.084)
and the slope of the right-hand side of the magnitude and its uncertainty (2.401+/-0.021)
The second line gives the measured flux of the object i.e. SN (12787.6+/-491.16)
The third line gives the result of the measurement thanks to the Pogson formula
rom the first line (4.86+/-0.117)
The calculation of uncertainties is done by propagation of uncertainties. It
should be noted that the significant
uncertainty in the reference is found in the measurement magnitude.
Measure by SuperEtoile The first line gives the total flux of the SuperStar.
The second line gives the equivalent magnitude of the SuperStar calculated using the
catalogued magnitudes for each standard.
The third line gives the measured flux for the object i.e. SN (12787.6+/-491.16)
The fourth line gives the measurement result (14.88+/-0.075) La première
ligne donne le flux total de la SuperEtoile.
All that remains is for you to select the line containing the magnitude measurement and
copy and past it in your report using the keys Ctrl+Ins (To copy) and Shift+Ins (To paste).
To clear all flux and magnitude values, you can select Analyse/Photometry/Reinitialise.
To access directly the configuration window, select Analyse/Photometry/Configuration.
Tip 1 : Before measuring the standards, I adjusted the width of the modeling window to 11 to
be sure to measure most of flux without having close stars in the window.
Tip 2: Before measuring the supernova, I adjusted the width of the modeling window to 5 to
have the smallest possible part of the core of the galaxy included in the window and thus minimize
the modeling errors.
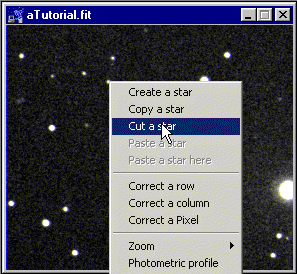
Tip 3: If a star is too close to the modeling window, you can minimize its impact on
the measurement by removing it. Click on the star using the right mouse to bring up the menu then
click on Couper star :